Customize the Main Menu
This guide explains how the Main Menu works and how to customize it: adding a button, changing a button's look and defining a custom button order. It is one of the simplest UI customizations in PSDK, perfect as a first contact with the engine's UI code.
How the Main Menu works
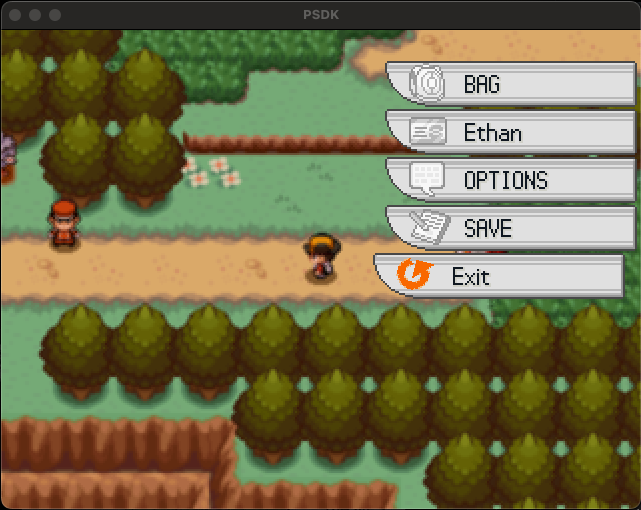
The Main Menu (often just called Menu) lets the player access the main interfaces of the game. Internally, its model is simple: an ordered list of buttons, where each button is registered with two pieces of information.
- An action: a Symbol naming the method of
GamePlay::Menuthat is called when the player presses the button. - A visibility condition: a block evaluated every time the menu opens. The button only shows when the block returns a truthy value.
This is why the screenshot above has no Dex and no party button: their conditions are false as long as the player has no Dex and no creature. Here are the buttons PSDK registers by default:
| Button | Action | Condition | Meaning |
|---|---|---|---|
| Dex | :open_dex | $game_switches[Yuki::Sw::Pokedex] | The game switch enabling the Dex is on |
| Party | :open_party | $actors.any? | The player has at least one creature |
| Bag | :open_bag | !$bag.locked | The bag is not locked by an event |
| Trainer card | :open_tcard | true | Always visible |
| Options | :open_option | true | Always visible |
| Save | :open_save | !$game_system.save_disabled | Saving is not disabled by an event |
| Quit | :open_quit | true | Always visible, always pushed to the end |
Since the conditions are re-evaluated each time the menu opens, a button appears as soon as its condition becomes true. For example, the party button shows up right after the player receives their first creature.
How to open the menu
In game, press V (the physical key bound to the X input by default).
From a script, call GamePlay.open_menu.
If you want to replace the PSDK Main Menu with your own fully home-made Menu, assign your class to GamePlay.menu_class. This is an advanced move: your class must respect MenuMixin (scripts/4 Systems/100 Menu/099 MenuMixin.rb), which defines the execute_skill_process function that Scene_Map needs to execute field moves properly. For most needs, the customizations below are enough, with no need to rewrite the whole scene.
Where to write your customizations
Never edit the engine files: the next PSDK update would overwrite your changes. Instead, write your customizations in your own script inside your project's scripts/ folder, by reopening the GamePlay::Menu class. If this technique is new to you, read What is monkey-patching and how to apply it in PSDK? first.
module GamePlay
  # Reopen the engine class to add our own registrations
  class Menu
    # Your customizations go here
  end
end
All the examples below go inside this block.
How to add a button
Call GamePlay::Menu.register_button with the action Symbol and the visibility condition. One important thing to understand: the engine has already registered the seven default buttons when your script runs. register_button appends to that list, it does not replace anything. So registering :open_party again would give the menu two party buttons; use register_button to add new buttons only (to modify the default ones, see the last section).
The action Symbol must name a method of GamePlay::Menu. For a brand new button, you define that method yourself in the reopened class. A complete example with a quest journal:
module GamePlay
  class Menu
    register_button(:open_quests) { $game_switches[42] }

    private

    # Open the quest journal UI
    def open_quests
      call_scene(MyGame::QuestUI)
    end
  end
end
Here MyGame::QuestUI stands for whatever scene your button should open, and game switch 42 controls when the button shows up. call_scene is the same helper the engine uses for its own buttons (look at open_save in scripts/4 Systems/100 Menu/100 Menu.rb).
A new button displays the Quit icon and text by default! Read on to understand why, and how to fix it.
Each button finds its icon and its text through its index in the registration list:
- The icon comes from the
menu_iconsfile in your project's interface graphics. It is a sprite sheet of 2 columns (normal and selected state) by 8 rows, and the button uses the row matching its index. Your first custom button has index 7, so draw its icon on the 8th row (by default that row holds the girl bag variant: replace it or use a button overwrite). - The text comes from the
textmethod ofUI::PSDKMenuButtonBase(scripts/4 Systems/100 Menu/300 MenuButtonBase.rb), which is acaseon the index. Any index it does not know falls back to the Quit text, hence the warning above. Patch this method withprepend, the technique detailed in the monkey-patching guide, to add your own entry:
module UI
  class PSDKMenuButtonBase
    # Patch to add the text of the quest button (index 7)
    module QuestButtonText
      # Get the text based on the index
      # @return [String]
      def text
        return 'Quests' if @index == 7

        super
      end
    end

    prepend QuestButtonText
  end
end
How to change a button's look
A button overwrite replaces the button class used for one specific index, which lets you change anything: icon, text, or the whole look. The engine itself uses one: when the player plays a girl, the bag button (index 2) is rendered by UI::GirlBagMenuButton, which uses the 8th row of menu_icons instead of the 3rd.
GamePlay::Menu.register_button_overwrite(2) { $trainer.playing_girl ? UI::GirlBagMenuButton : nil }
The block is evaluated when the menu opens: return a class to use it, or nil to keep the default button.
Overwrites target the real_index (the position in the registration list), not the position on screen. The two differ as soon as a button is hidden: if the player has no Dex, the party button keeps real_index 1 but is drawn first on screen (positional_index 0). The real_index drives the icon and text, the positional_index drives the position (see UI::PSDKMenuButtonBase).
How to change the default buttons
To remove a default button, change its condition or reorder the list, you cannot edit a registered entry: clear everything and re-register the list your way.
module GamePlay
  class Menu
    clear_previous_registers
    register_button(:open_party) { $actors.any? }
    register_button(:open_bag) { !$bag.locked }
    register_button(:open_save) { !$game_system.save_disabled }
    register_button(:open_quit) { true }
  end
end
The default registration in scripts/4 Systems/100 Menu/100 Menu.rb (shown in the table at the top) is your reference for the actions and conditions to re-register.
Reordering changes every button's index, and the icons and texts are indexed: with the order above, the party button would display the Dex icon. Fix the menu_icons rows and the text method of UI::PSDKMenuButtonBase to match your new order.
Conclusion
- The Main Menu is an ordered list of buttons; each button is an action (a method of
GamePlay::Menu) plus a visibility condition evaluated when the menu opens. - Write your customizations in your own script by reopening
GamePlay::Menu, and never edit the engine files. register_button(:action) { condition }appends a new button; the seven default buttons are already registered.- A brand new button needs three things: the registration, the action method, and its icon/text (row in
menu_iconsplus aprependpatch oftextinUI::PSDKMenuButtonBase). register_button_overwrite(real_index) { CustomClass }changes how one button is rendered.clear_previous_registersthen re-registering everything is the way to remove, modify or reorder the default buttons. Keepmenu_iconsandtextconsistent with the new order.